Scheduling a notebook
A scheduled notebook runs unattended at a recurring time, with date variables in your SQL and Python that resolve to fresh values on every run. A notebook that asks for "yesterday's transactions" today will ask for the previous day's transactions tomorrow, automatically.
Goal
You finish this page with a notebook scheduled to run on a recurring schedule, with at least one date variable used inside it.
Prerequisites
- An existing notebook that runs successfully end-to-end when you trigger it manually. Schedules execute the notebook exactly as you saved it; if it fails interactively, it'll fail on the schedule.
- Your account's daily execution quota covers the cadence you want (system default 100/day; admins can override).
Steps
1. Open the notebook and trigger scheduling
Open the notebook from the Notebooks IDE. In the menu bar at the top of the editor, click File → Schedule Execution (the label changes to Manage Schedule if a schedule already exists for the notebook).
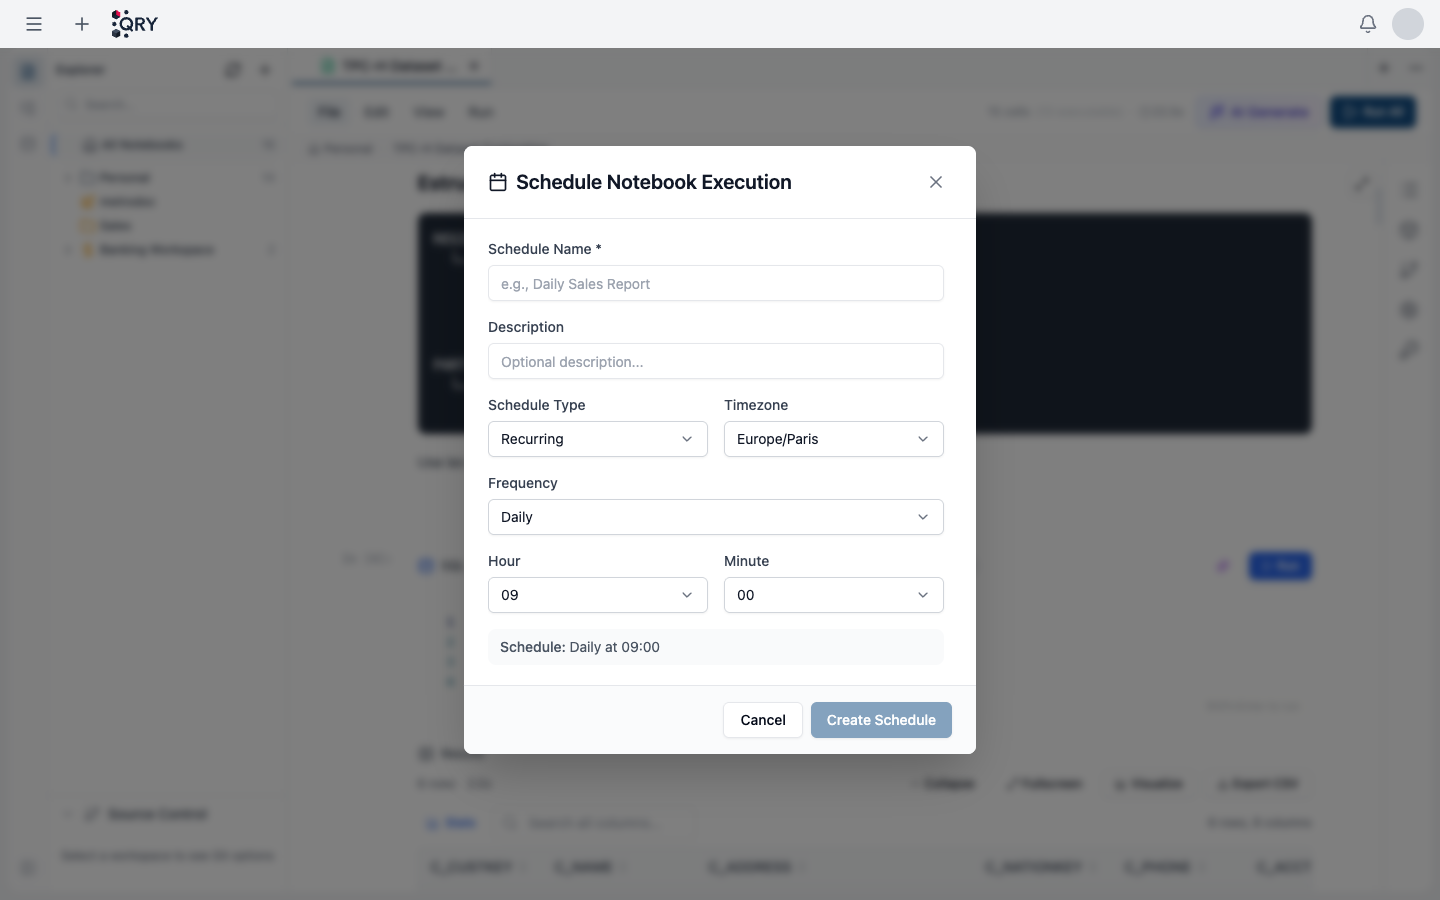
2. Fill in the schedule details
- Schedule Name (required) — appears in the Scheduled Tasks management view.
- Description (optional) — shown alongside the name.
- Schedule Type —
Recurringfor hourly / daily / weekly / monthly cadences, orOne-timefor a single future run (QRY sets a dummy cron andmax_executions=1). - Timezone — defaults to your tenant's default. Pick the one you want delivery times to honour.
- Frequency — Hourly, Daily, Weekly, Monthly. The form switches between hour/minute, day-of-week, day-of-month inputs accordingly.
- Hour / Minute (or weekday / day-of-month) — the rest of the cron expression.
The dialog shows a human-readable preview at the bottom (e.g. Schedule: Daily at 09:00) so you can sanity-check before saving.
3. Use date variables in your notebook
Date variables resolve at execution time. Use them in SQL and Python cells so the notebook always queries "fresh" data:
| Variable | Resolves to |
|---|---|
{{today}} | The execution date (timezone-aware) |
{{yesterday}} | The day before the execution date |
{{this_week_start}} / {{this_week_end}} | Monday / Sunday of the execution week |
{{this_month_start}} / {{this_month_end}} | First / last day of the execution month |
{{last_month_start}} / {{last_month_end}} | First / last day of the previous month |
Example SQL cell:
SELECT *
FROM orders
WHERE order_date >= '{{last_month_start}}'
  AND order_date <= '{{last_month_end}}'
4. Save the schedule
Click Create Schedule. The notebook now appears in the Scheduled Tasks management view with type Notebook, the cadence you chose, and an Active status.
A green Scheduled badge appears in the notebook's menu bar. Click it any time to open the same dialog and adjust the schedule, pause it, or delete it.
Result
The notebook runs at its next scheduled tick, with date variables resolving to the execution time.
Common issues
The schedule preview shows the wrong time. You probably picked the wrong timezone. Re-open the dialog and switch — the cron expression rebuilds for the new timezone.
Date variables produce empty queries.
The variable substitution happens at execution; in the editor, the SQL still has the literal {{today}} text and won't run as-is unless you click the cell-level "preview substitution" toggle. Check the Scheduled Tasks page → click into the notebook task → view the most recent execution log to see the actual substituted SQL.
Schedule disabled after a few runs. Three consecutive failures auto-disable a schedule. Open the task in Scheduled Tasks, look at the latest execution error, fix it, and re-enable.
One-time schedules fired too early / too late. Pick the timezone explicitly when you create the schedule. The default is the tenant default, not your browser's local time.
See also
- Creating a notebook — pre-requisite: a notebook that runs end-to-end.
- Cell types and models — what each cell type does.
- Creating a scheduled task — the parallel for conversations and jobs.
- Scheduled Notebooks reference — full feature reference, including all date-variable details.